
LDAPとはなんじゃいって感じですが、簡単にいうと。
インターネットを介してディレクトリデータベースにアクセスする為のプロトコルです。
ふつう、こんなこと言われてわかるのはサーバーエンジニアの上級者くらいかと、勝手にネットワークエンジニア上がりの自分が思うところであります。
難しいことは考えないでLDAP構築しようじゃないか
だな。難しいこと考えても、らちがあかないので構築していくのみ!って感じです。
じぶんは、てんで頭が悪いのでとりあえず構築して体で覚えて、動作を一つ一つ確認しながら理解していく人間です。
なので、軽くこのLDAPのディレクトリサービスを、なんとなく理解したつもりで構築していきます。
ディレクトリサービスとは
ディレクトリサービスとはユーザーのHP容量貸し(レンタルサーバかな)、メールアドレスなどに関する情報を管理するサービスのこと。
管理されたユーザ名からこれらの情報を検索することができ、ディレクトリサービスをユーザ管理だけでなく、プリンタなどのネットワーク上の共有資源の管理に応用することもできる。
パッケージインストール実施
バージョン確認
$ cat /etc/redhat-release
CentOS release 6.4 (Final)
$
インストール実施
$ yum install openldap-servers openldap-clients

Complete!
↑インストール成功
$
LDAPサーバの設定
”updatedb”コマンド実施
locateコマンドが参照するファイル名データベースを再構築するコマンドみたいです。
$
$ updatedb
$
”locate”コマンド実施(ファイルを検索する)
$ locate slapd.conf
/usr/share/man/man5/slapd.conf.5.gz
/usr/share/openldap-servers/slapd.conf.obsolete
※ここはopenLDAPで必要な設定ファイルを検索している
設定ファイルをコピーし、設置する
$ cp /usr/share/openldap-servers/slapd.conf.obsolete /etc/openldap/slapd.conf

 ll /etc/openldap/
合計 24
drwxr-xr-x. 2 root root 4096 11月 25 17:33 2013 certs
-rw-r--r--  1 root root  280  4月 29 16:50 2013 ldap.conf
drwxr-xr-x  2 root root 4096 11月 25 17:33 2013 schema
-rw-r--r--  1 root root 4635 11月 28 19:25 2013 slapd.conf
drwx------  3 ldap ldap 4096 11月 25 17:33 2013 slapd.d
$
管理者用のパスワードを事前に生成しておく。
$ slappasswd -s cocobat
{SSHA}Zmhsz1CnznuqqprtLozETVtcrR86xpNq  ←これをメモしておく。
$
ファイルをバックアップ
$
$ cd /etc/openldap/
$ cp slapd.conf slapd.conf.original
$
※設定する箇所のコマンドの意味
suffix : ディレクトリサービスの基点となるディレクトリ
rootdn : LDAPディレクトリ管理者(ルートDN)
rootpw : ルートDNのパスワード
設定ファイルを変更する
$ vi slapd.conf

:set nu ←行に番号を付けて見やすくする。

設定内容

95 # rootdn can always read and write EVERYTHING!
96
97 # enable on-the-fly configuration (cn=config)
98 rootdn cn=admin,cn=config
99 rootpw {SSHA}Zmhsz1CnznuqqprtLozETVtcrR86xpNq ←変更
100
101 database config
102 access to *
103 by dn.exact="gidNumber=0+uidNumber=0,cn=peercred,cn=external,cn=auth" manage
104 by * none

〜〜〜〜

113 #######################################################################
114 # database definitions
115 #######################################################################
116
117 database bdb
118 #suffix "dc=my-domain,dc=com"
119 suffix "dc=cocobat,dc=com" ←変更
120 checkpoint 1024 15
121 #rootdn "cn=Manager,dc=my-domain,dc=com"
122 rootdn cn=Manager,dc=cocobat,dc=com
123 rootpw {SSHA}Zmhsz1CnznuqqprtLozETVtcrR86xpNq ←変更

〜〜〜〜
差分確認
$ diff /usr/share/openldap-servers/slapd.conf.obsolete /etc/openldap/slapd.conf
97a98,100
> rootdn                cn=admin,cn=config
> rootpw                {SSHA}et/W7jd39CkaUjJoAqsNWevrNHHwkEge
>
115c118,119
< suffix                "dc=my-domain,dc=com" --- > #suffix               "dc=my-domain,dc=com";
< suffix                "dc=cocobat,dc=com"
117c121,124
< rootdn                "cn=Manager,dc=my-domain,dc=com" --- > #rootdn               "cn=Manager,dc=my-domain,dc=com"
> rootdn                "cn=Manager,dc=cocobat,dc=com"
> rootpw                {SSHA}et/W7jd39CkaUjJoAqsNWevrNHHwkEge
念のため最初からあったファイルを削除しておく
$ cd /etc/openldap/slapd.d/
 ll
total 8
drwx------ 3 ldap ldap 4096 Jun 11 01:30 cn=config
-rw------- 1 ldap ldap 1131 Jun 11 01:30 cn=config.ldif
 rm -rf ./*
$
$
$ cd /var/lib/ldap/
 ll
total 0
 rm -rf ./*
$
LDAPのデータベースを作成する
$ cp /usr/share/openldap-servers/DB_CONFIG.example /var/lib/ldap/DB_CONFIG
$
$ echo "" | slapadd -f /etc/openldap/slapd.conf
The first database does not allow slapadd; using the first available one (2)
$
設定ファイルを変更したので設定ファイルの変換処理を行う
$ slaptest -f /etc/openldap/slapd.conf -F /etc/openldap/slapd.d
config file testing succeeded
$
設定したファイルに権限を付与
$
$ chown -R ldap:ldap /var/lib/ldap
$ chown -R ldap:ldap /etc/openldap/slapd.d
$
LDAPの起動
$ service slapd start
slapd を起動中: [ OK ]

 chkconfig slapd on
$
syslogの設定(ログを吐かせるようにする)
$ vim /etc/rsyslog.conf
# Save boot messages also to boot.log
local7.* /var/log/boot.log

# openldap slapd log   ←追記
local4.* /var/log/slapd  ←ここまで

# ### begin forwarding rule ###
〜〜〜
シスログを再起動
$ service rsyslog restart
システムロガーを停止中: [ OK ]
システムロガーを起動中: [ OK ]
$
LDAP再起動
$ service slapd restart
slapd を停止中: [ OK ]
slapd を起動中: [ OK ]
$
動作確認
$ less /var/log/slapd
Nov 28 20:33:16 t-bobo011 slapd[8962]: daemon: shutdown requested and initiated.
Nov 28 20:33:16 t-bobo011 slapd[8962]: slapd shutdown: waiting for 0 operations/tasks to finish
Nov 28 20:33:16 t-bobo011 slapd[8962]: slapd stopped.
Nov 28 20:33:16 t-bobo011 slapd[9051]: @(#) $OpenLDAP: slapd 2.4.23 (Apr 29 2013 07:47:08) $#012#011mockbuild@c6b7.bsys.dev.centos.org:/builddir/build/BUILD/openldap-2.4.23/openldap-2.4.23/build-servers/servers/slapd
Nov 28 20:33:16 t-bobo011 slapd[9052]: slapd starting

※syslogを出力したことに成功
$
初期データの投入
ディレクトリ作成
$ pwd
/root

$ mkdir ldap-data
$ cd ldap-data/
作成したディレクトリ配下に下記ファイルを作成
$ vi init.ldif

dn: dc=cocobat,dc=com
objectClass: organization
objectClass: dcObject
o: Cocobat
dc: cocobat

dn: cn=Manager,dc=cocobat,dc=com
objectClass: organizationalRole
cn: Manager
$
動作確認
$ ldapadd -x -D "cn=Manager,dc=cocobat,dc=com" -W -f init.ldif
Enter LDAP Password:
adding new entry "dc=cocobat,dc=com"

adding new entry "cn=Manager,dc=cocobat,dc=com"
↑上記のように成功したことを確認
$
$
2回目以降は以下のように確認すれば大丈夫です。
$ ldapadd -x -D "cn=Manager,dc=cocobat,dc=com" -W -f init.ldif
Enter LDAP Password:
adding new entry "dc=cocobat,dc=com"
ldap_add: Already exists (68) ←すでに存在するファイルって意味なんで問題なし
$
もう一つファイルを下記のように作成
$ vim people-service.ldif
dn: ou=People,dc=cocobat,dc=com
objectClass: organizationalUnit
ou: People

dn: ou=Service,dc=cocobat,dc=com
objectClass: organizationalUnit
ou: Service
$
動作確認
$ ldapadd -x -D "cn=Manager,dc=cocobat,dc=com" -W -f people-service.ldif
Enter LDAP Password:
adding new entry "ou=People,dc=cocobat,dc=com"

adding new entry "ou=Service,dc=cocobat,dc=com"

↑上記のように成功したことを確認
$
2回目以降
$ ldapadd -x -D "cn=Manager,dc=cocobat,dc=com" -W -f people-service.ldif
Enter LDAP Password:
adding new entry "ou=People,dc=cocobat,dc=com"
ldap_add: Already exists (68) ←すでに存在するファイルって意味なんで問題なし
$
作成したファイルの検索を実施
$ ldapsearch -x -D "cn=Manager,dc=cocobat,dc=com" -W -b 'ou=People,dc=cocobat,dc=com' '(objectClass=*)'
Enter LDAP Password:
# extended LDIF
#
# LDAPv3
# base <ou=people,dc=cocobat,dc=com> with scope subtree
# filter: (objectClass=*)
# requesting: ALL
#

# People, cocobat.com
dn: ou=People,dc=cocobat,dc=com
objectClass: organizationalUnit
ou: People

# search result
search: 2
result: 0 Success

# numResponses: 2
# numEntries: 1

↑この出力結果が出ればOK
$
$
phpLDAPadminをインストールする
該当ファイルをダウンロード
$ wget https://sourceforge.net/projects/phpldapadmin/files/latest/download?source=files

`phpldapadmin-1.2.3.tgz' に保存中

100%[=================================================================================================================>] 1,115,707 3.57M/s 時間 0.3s

2013-11-28 20:43:27 (3.57 MB/s) - `phpldapadmin-1.2.3.tgz' へ保存完了 [1115707/1115707]
ダウンロードしたファイルを解答
$
$ tar xzvfp phpldapadmin-1.2.3.tgz
$
解答ファイルを下記にて変更
$
$ mv phpldapadmin-1.2.3 phpldapadmin
$
apache設定を追記
$
$ cd /etc/httpd/conf
$
$ cd /etc/httpd/conf

下記を編集
$ vim httpd.conf
# We include the /icons/ alias for FancyIndexed directory listings.  If you
# do not use FancyIndexing, you may comment this out.
#
Alias /icons/ "/var/www/icons/"

<Directory "/var/www/icons">
    Options Indexes MultiViews FollowSymLinks
    AllowOverride None
    Order allow,deny
    Allow from all

Alias /ldapadmin/ /usr/local/phpldapadmin/htdocs/	←追記
<Directory "/usr/local/phpldapadmin/htdocs">
        DirectoryIndex index.php index.html
						←ここまで

#
# WebDAV module configuration section.
phpLDAPadminの設定ファイルを変更する
$
$ cd /usr/local/phpldapadmin/config   ←以下階層へ移動
$
$
$ cp config.php.example config.php  ←バックアップ
$
$ vi config.php
288 /* Examples:
289 'ldap.example.com',
290 'ldaps://ldap.example.com/',
291 'ldapi://%2fusr%local%2fvar%2frun%2fldapi'
292 (Unix socket at /usr/local/var/run/ldap) */
293 $servers-<setValue('server','host','127.0.0.1'); ←コメントアウトを外す
294
295 /* The port your LDAP server listens on (no quotes). 389 is standard. */
296 $servers-<setValue('server','port',389); ←コメントアウトを外す
297
差分確認
$ diff config.php.example config.php
293c293
< // $servers->setValue('server','host','127.0.0.1');
---
> $servers->setValue('server','host','127.0.0.1');
296c296
< // $servers->setValue('server','port',389);
---
> $servers->setValue('server','port',389);
$
apache再起動
$ service httpd restart
httpd を停止中: [ OK ]
httpd を起動中: httpd: Could not reliably determine the server's fully qualified domain name, using 192.168.10.94 for ServerName
[ OK ]
$
PHP5yumインストール
リストを確認(リストの事前チェックみたいな感じです。)
$
$ yum list | grep php
$
インストール実施
$
$ yum -y install php

〜〜〜〜(中略)

Complete!
$
PHPモジュールの追加(必要に応じて追加する)
PostgreSQL関数を利用するためモジュールを追加する。
$
$ yum install php-pgsql

〜〜〜〜(中略)

Complete!
$
マルチバイト文字列関数用のモジュールを追加
$
$ yum install php-mbstring

〜〜〜〜(中略)

Complete!
$
画像処理モジュールGDを追加
$
$ yum install php-gd

〜〜〜〜(中略)

Complete!
$
ログイン画面にアクセス
“https://localhost/ldapadmin/”
または
“https://openldapサーバのアドレス/ldapadmin/”
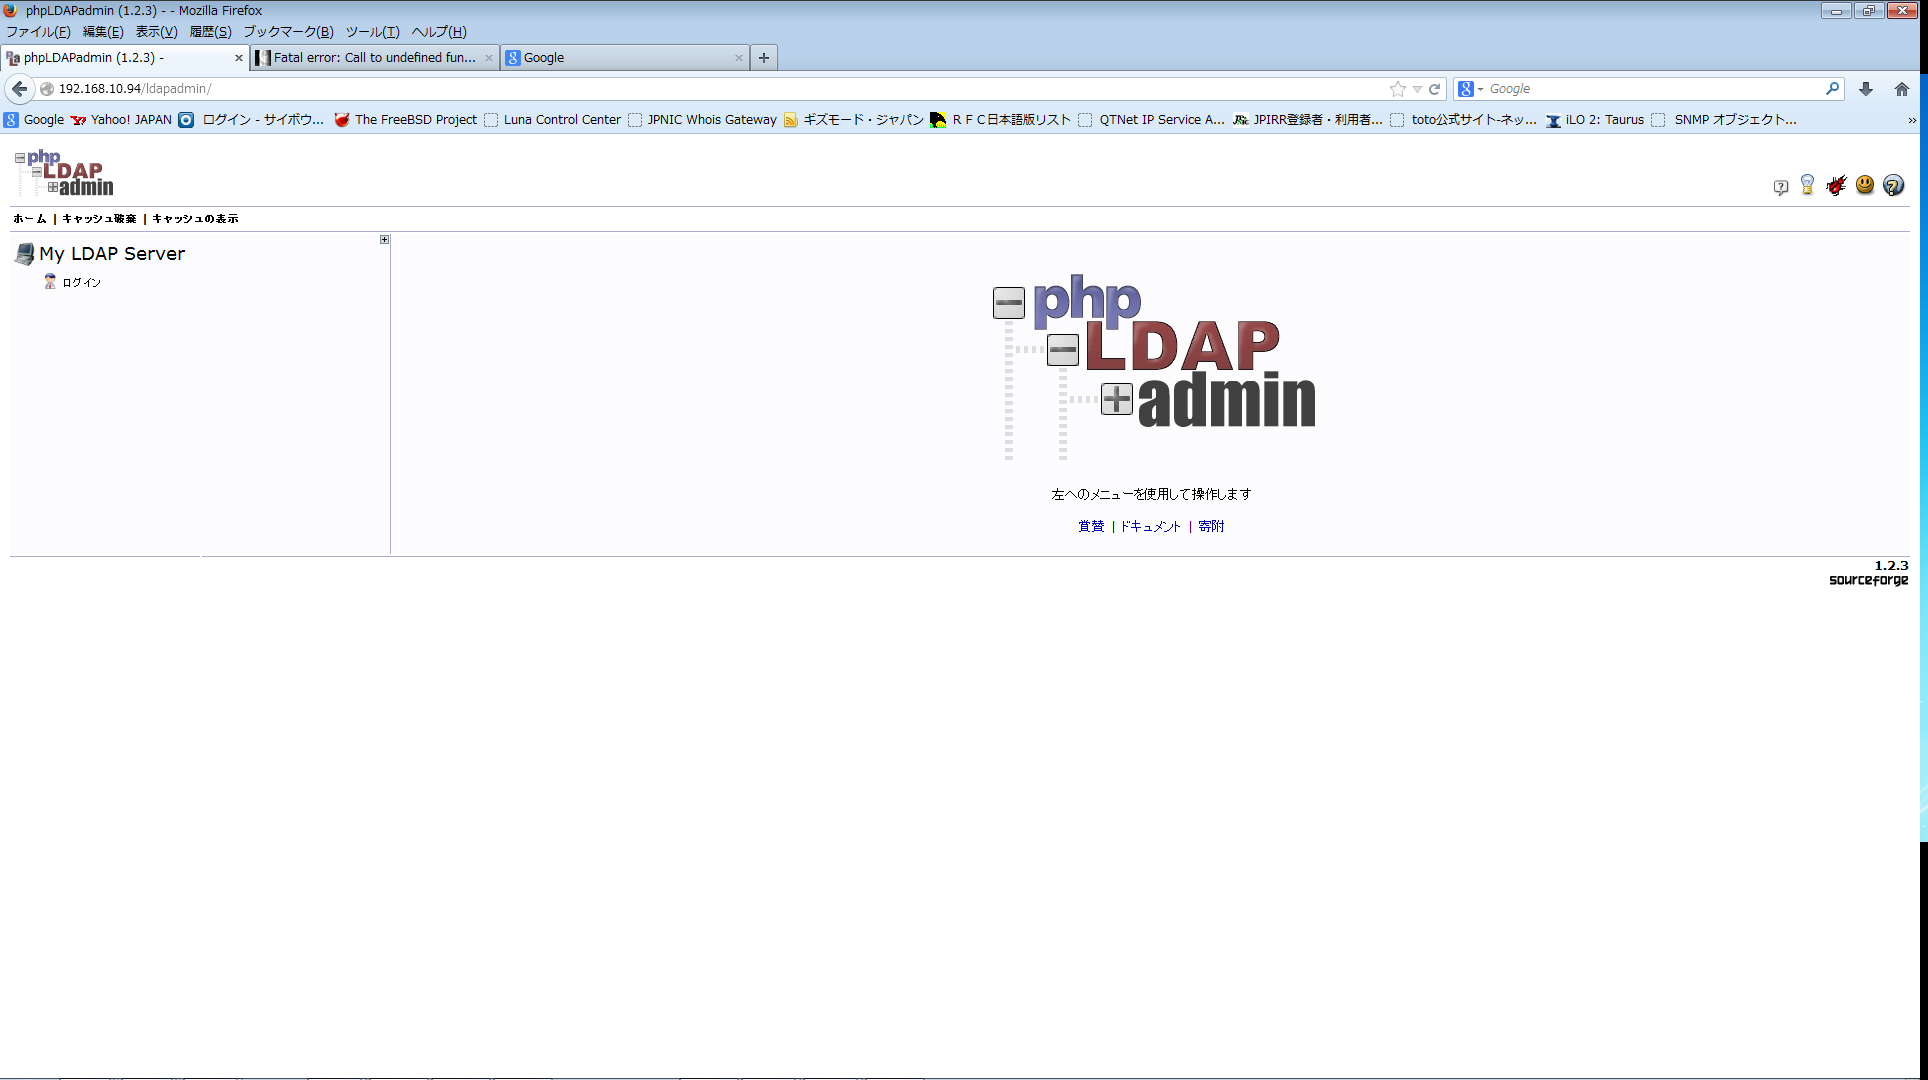
ログインとパスワードは事前に設定したものを使う。
ログインDN:cn=Manager,dc=cocobat,dc=com
パスワード:cocobat
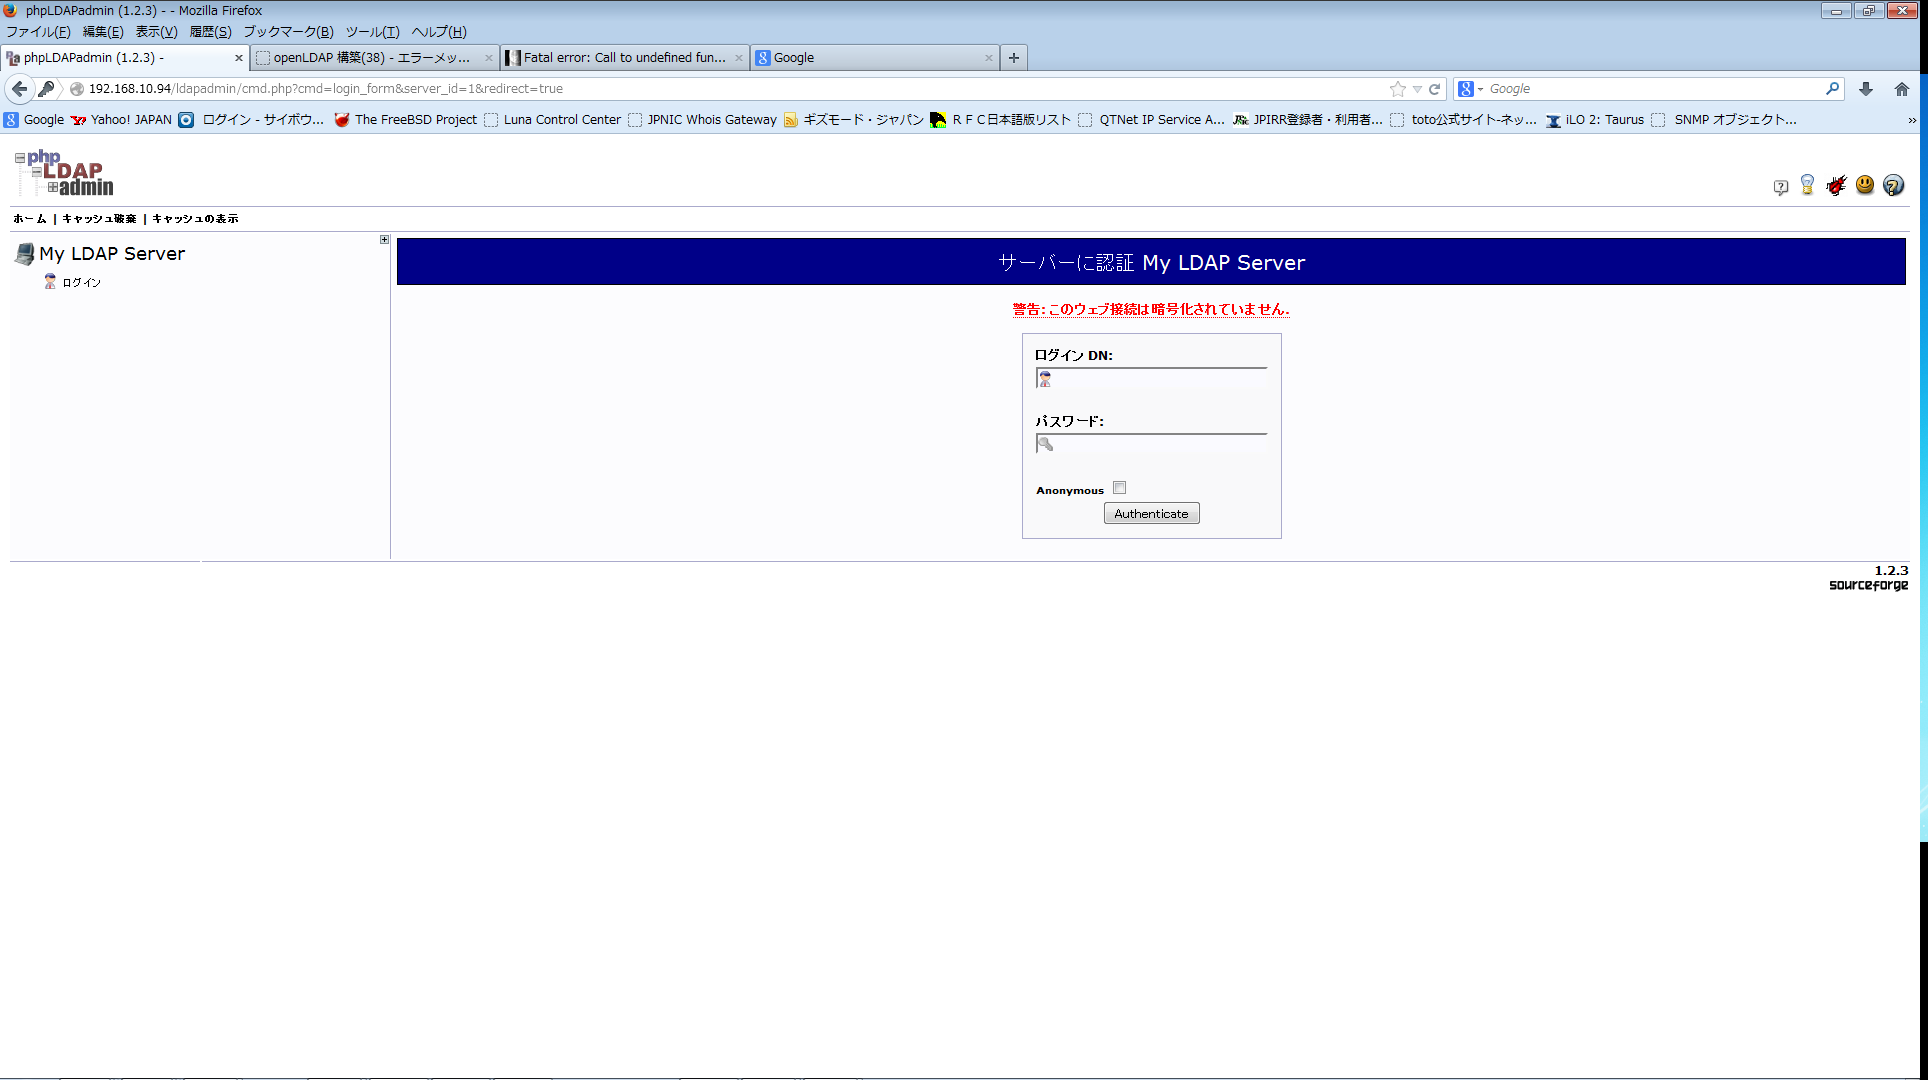
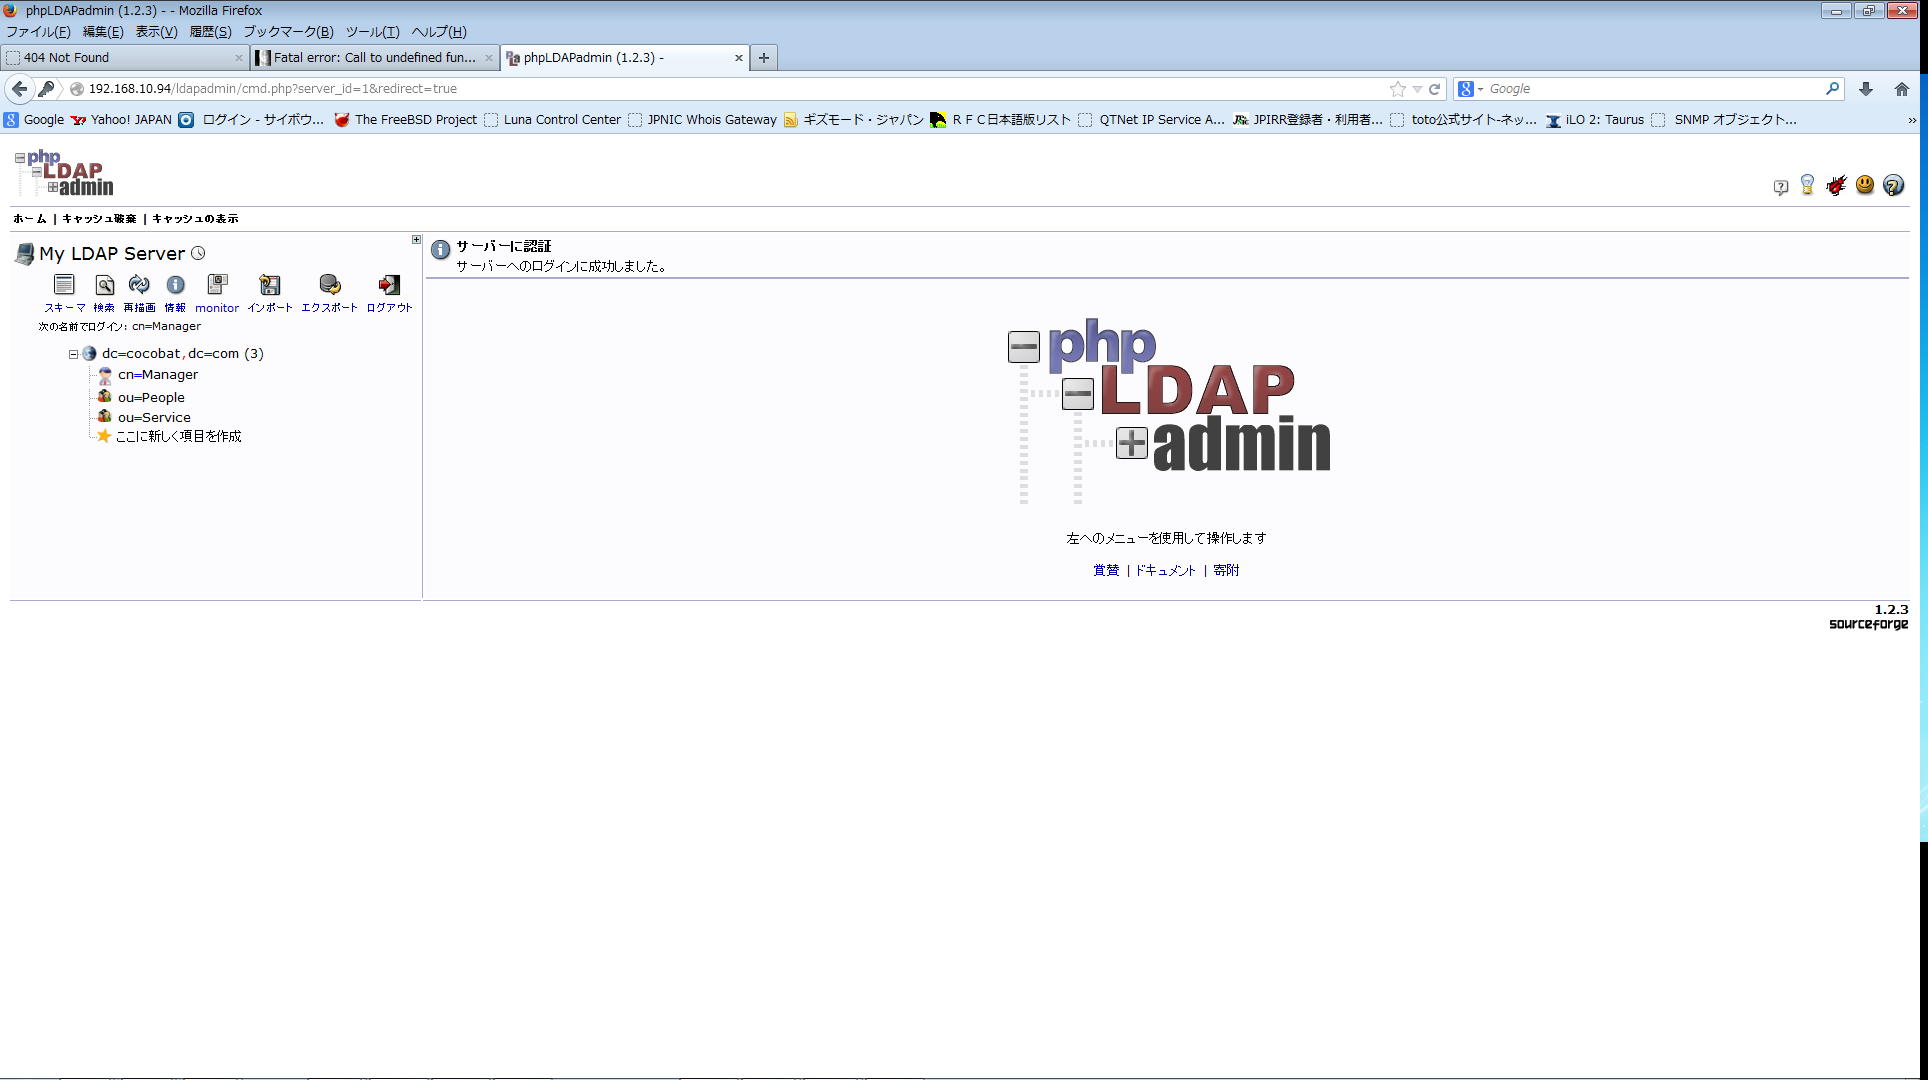
成功すれば
追記:ブラウザで下記エラー発生が発生した場合
よし、ここまでくればってことでブラウザを確認するとエラーが出ちまった!
ってじぶんがなったので追記します。
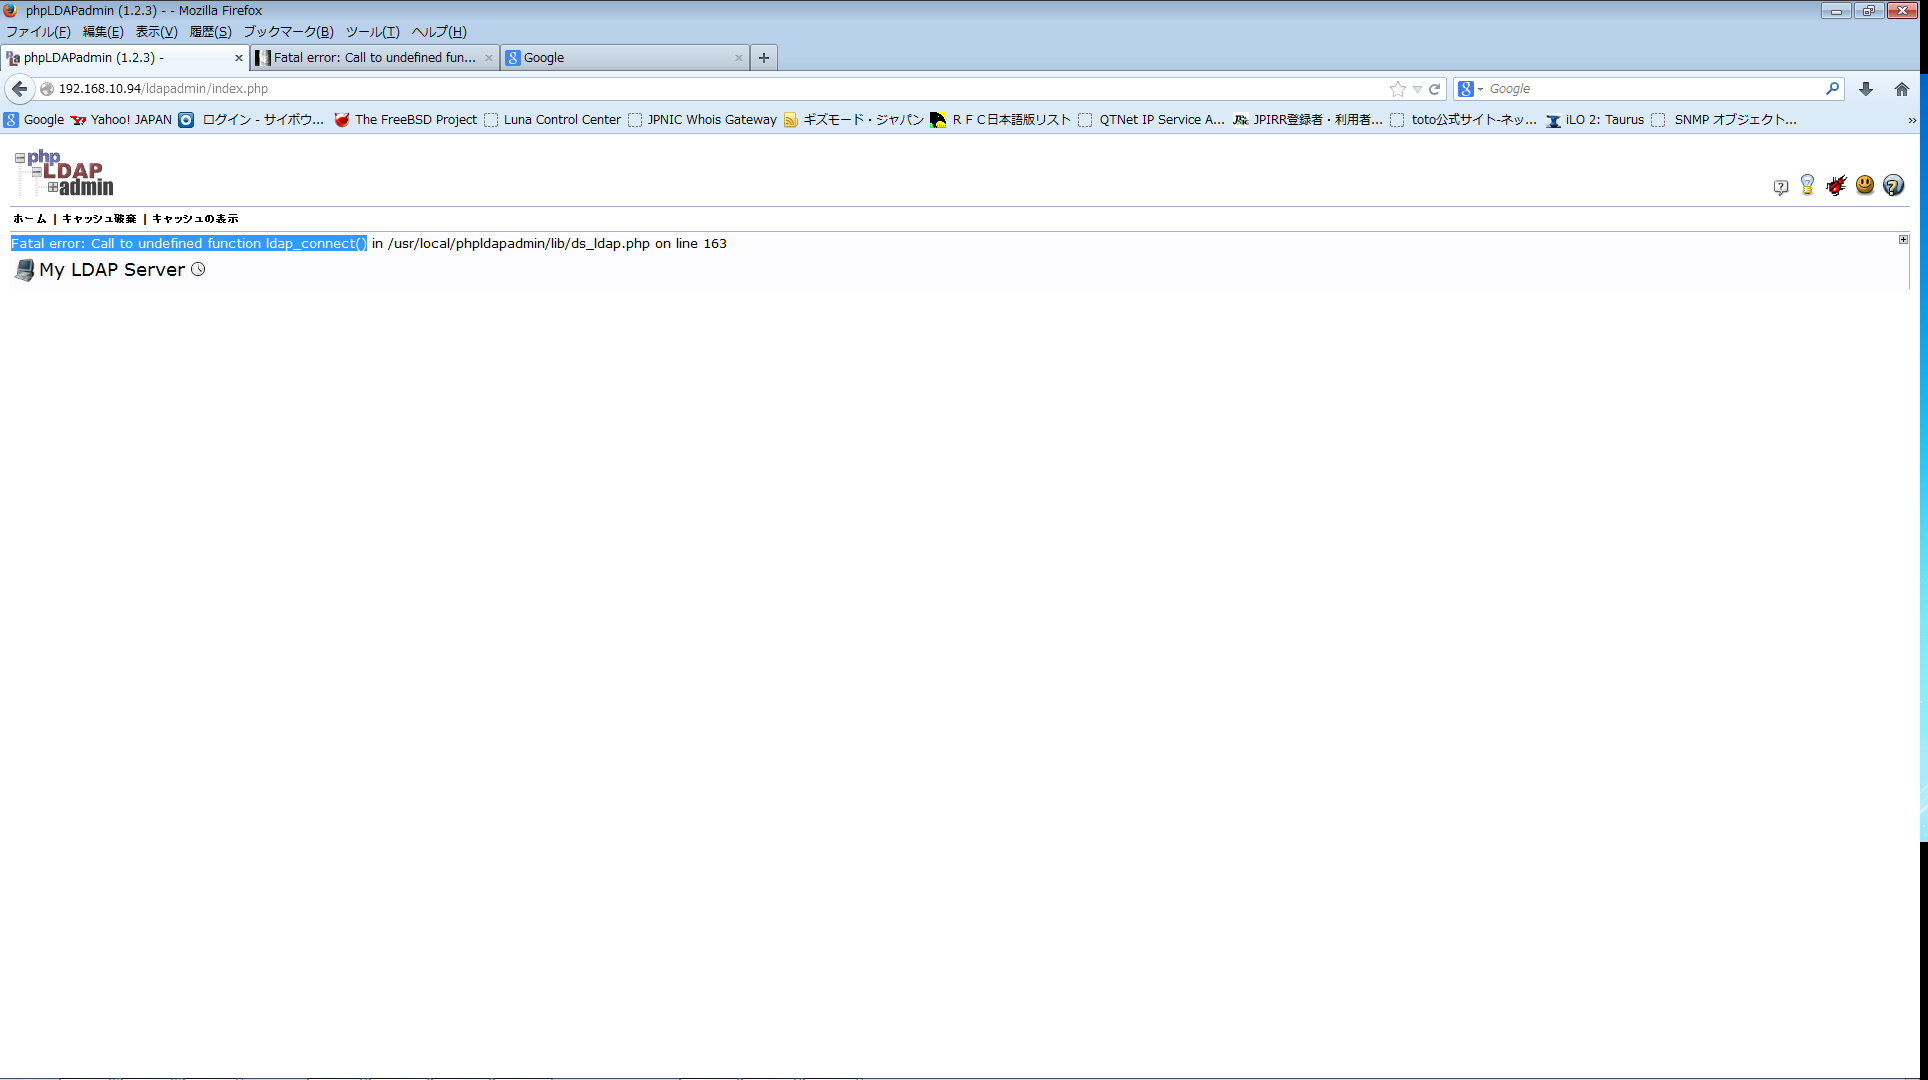
Fatal error: Call to undefined function ldap_connect()
※php-ldapのパッケージが入ってないとのことでインストール実施
$
$ yum -y install php-ldap

〜〜〜〜(中略)

Complete!
$
apacheを再起動
$ service httpd restart
httpd を停止中: [ OK ]
httpd を起動中: httpd: Could not reliably determine the server's fully qualified domain name, using 192.168.10.94 for ServerName

[ OK ]
$
まとめ
どうでしょうか、なんとなく感じはつかめたでしょうか?
じぶんはphpLDAPが見えた時は
よっしゃー!
って感じです!
とりあえず、モチベーション上げていきましょう。やはり、ネットワークとは違った意味で構築できれば感動です。
それでは!

エンジニアのオンライン学習
ITエンジニアにおすすめの教材、オンラインスクールです。
無料からエンジニアの学習ができる教材などまとめているので参考にしてください。
| おすすめオンライン教材 | |
| 自宅で学習ができるオンラインスクール | |
ITエンジニアの開発・検証・学習としてインターネット上で専用のサーバ(VPS)を利用しましょう!
実務経験はVPSで学べます。


コメントを残す