Pythonプログラムで「tkinter」と「paramiko」を利用し、Cisco機器へ自動アクセス・任意の複数のコマンドの出力結果を出力するプログラムを作成しました。
Cisco機器だけでなく、そのほかのSSHで接続できる機器であれば、互換性はあるので参考にしてください。
このプログラムを実行したPythonのバージョンは以下となります。
PS C:> python -V
Python 3.8.1
「tkinter」と「paramiko」ライブラリでCisco機器に複数コマンド実行&ファイル出力プログラム
現在、Pythonで自動でNW機器のパラメーターシートを作成するプログラムを作成中で途中ですが、NW機器へのSSHアクセスをコマンドの出力結果を出すコードを展開します。
Cisco機器では複数コマンドを利用する場合、いろんなサイトでは結構難しいコードを書いているのですが、paramikoライブラリを利用した複数コマンドは以下のようになります。
'show version ; show ip route ; show run'
使用したいコマンドの間に「スペース」とセミコロン「;」を使って区切ることにより、複数コマンドを実行することができます。
また、アクセス時にtkinterを使用し、アクセス用のアプリを起動し、アクセス先のIP、ユーザー名、パスワードを設定することで自動でコマンドを出力してくれます。
以下でプログラムを記載しました。
NW機器へのSSH接続と出力結果をファイルで出力するコード
今回作成したコードは以下となります。
事前に「tkinter」と「paramiko」をpythonでインストールしていることが条件となります。
出力するコマンドは「show ver」、「show ip route」、「show run」となります。
ここはコマンド編集できますし、区切れば何個でも出力することができます。
※ ssh_test_tkinter_00_ssh_test.py
import tkinter
from tkinter import messagebox
import paramiko

#ボタンがクリックされたら実行
def button_click():
    input_host_value = input_name.get()
    input_name_value = input_address.get()
    input_pass_value = input_pass.get()
    input_command_value = ('show version ; show ip route ; show run')


    client = paramiko.SSHClient()
    client.set_missing_host_key_policy(paramiko.AutoAddPolicy())
    client.connect(input_host_value, username=input_name_value, password=input_pass_value)

    stdin, stdout, stderr = client.exec_command(input_command_value)
    stdin.write(input_command_value)

    for o in stdout:
        with open('file.txt', 'a', newline='') as f:
            print(o, end='', file = f)
            #print(o)  ←通常に出力したいときは#を削除

    for e in stderr:
        print(e)

    client.close()
    root.quit()

print('コンフィグ取得 > テキストファイル保存完了')


# tkinter_ウインドウの作成
root = tkinter.Tk()
root.title("SSH_LOG_GET GUI")
root.geometry("350x120")

# host/IPaddress
input_name_label = tkinter.Label(text="host")
input_name_label.grid(row=1, column=1, padx=10,)

# host/IPaddress入力欄の作成
input_name = tkinter.Entry(width=40)
input_name.grid(row=1, column=2)


# userID
input_address_label = tkinter.Label(text="name")
input_address_label.grid(row=2, column=1, padx=10,)

# userID入力欄の作成
input_address = tkinter.Entry(width=40)
input_address.grid(row=2, column=2)


# パスワード
input_pass_label = tkinter.Label(text="password")
input_pass_label.grid(row=3, column=1, padx=10,)

# パスワード入力欄の作成
input_pass = tkinter.Entry(show='*', width=40)
input_pass.grid(row=3, column=2)


#ボタンの作成
button = tkinter.Button(text="実行ボタン",command=button_click)
button.place(x=150, y=90)

#ウインドウの描画
root.mainloop()
実行結果
PS C:> python ssh_test_tkinter_00_ssh_test.py
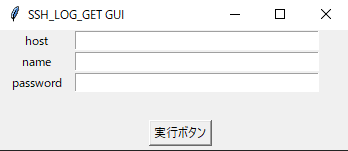
プログラムを実行すると以下のようにtkinterでアプリが起動します。
sshログインに必要な情報を記入して「実行ボタン」をクリックします。
うまくいくと以下のようにテキストファイルへの保存が完了したメッセージが表示されます。
PS C:> python ssh_test_tkinter_00_ssh_test.py
コンフィグ取得 > テキストファイル保存完了
PS C:>
ファイル形式は、テキストファイル、CSVファイル可能です。
Excelファイルは変換をしないといけないので以下の記事を参考にしてください。

Cisco機器用に複数コマンドを使用したい場合などは参考にしてください。
ITエンジニアの開発・検証・学習としてインターネット上で専用のサーバ(VPS)を利用しましょう!
実務経験はVPSで学べます。

コメント