Mailサーバを構築していくうちに、サーバーを「Webmin」で管理するとかどうとか耳にしました。
。。。「Webmin」???
ようはウェブブラウザ上で、GUIによるサーバ管理ができるアプリケーションみたいだったので、サーバ初心者の
自分は、とりあえず構築しとこってことで、今回構築してみようと思います。
Webminとは
WebminはLinuxやUnixなどのシステムをGUI上(ウェブブラウザ)で管理設定ができるツールです。
例えば、ユーザーアカウントの設定、管理やApacheなどのオープンソースのアプリケーションの変更、制御、
RAIDなどのハードウェアの設定などが可能です。
また、Webブラウザがフロントエンドのため、WindowsやMacOSで動作しているパソコンからも操作が可能となっています。
※外部からのアクセスを許可する場合はWebminで設定する必要があります。
Webminダウンロード
最新のパッケージをダウンロードしてください。
常にパッケージは更新されていきますので、上記のサイトへ行き最新のパッケージを確認後、以下のようにwgetでパッケージをダウンロードすることをお勧めします。
$ wget http://download.webmin.com/download/yum/webmin-1.670-1.noarch.rpm
--2014-02-13 18:33:44--  http://download.webmin.com/download/yum/webmin-1.670-1.noarch.rpm
download.webmin.com をDNSに問いあわせています... 108.60.199.115
download.webmin.com|108.60.199.115|:80 に接続しています... 接続しました。
HTTP による接続要求を送信しました、応答を待っています... 200 OK
長さ: 22155445 (21M) [application/octet-stream]
`webmin-1.670-1.noarch.rpm' に保存中

100%[=================================================================================================================================>] 22,155,445  2.18M/s 時間 11s

2014-02-13 18:33:57 (1.91 MB/s) - `webmin-1.670-1.noarch.rpm' へ保存完了 [22155445/22155445]
パッケージをインストールします
ここではrmpコマンドを使用したパッケージのインストールを実施します。
rpmでもそうですが引数をまだまだうまく使えません。。。
ここらへんも勉強していくのみだな。
$ rpm -Uvh webmin-1.670-1.noarch.rpm
警告: webmin-1.670-1.noarch.rpm: ヘッダ V3 DSA/SHA1 Signature, key ID 11f63c51: NOKEY
準備中...                ########################################### [100%]
Operating system is CentOS Linux
   1:webmin                 ########################################### [100%]
Webmin install complete. You can now login to https://t-bobo011:10000/
as root with your root password.
インストール後の設定
最終行にアクセスを許可するIPを追記します。
セキュリティ面からしてもアクセス許可は大切です。今回はとりあえず設定することにこだわったので、最終行への許可IPアドレスの追記はしませんでした。
$ cat /etc/webmin/miniserv.conf
port=10000
root=/usr/libexec/webmin
mimetypes=/usr/libexec/webmin/mime.types
addtype_cgi=internal/cgi
realm=Webmin Server
logfile=/var/webmin/miniserv.log
errorlog=/var/webmin/miniserv.error
pidfile=/var/webmin/miniserv.pid
logtime=168
ppath=
ssl=0
env_WEBMIN_CONFIG=/etc/webmin
env_WEBMIN_VAR=/var/webmin
atboot=1
logout=/etc/webmin/logout-flag
listen=10000
denyfile=\.pl$
log=1
blockhost_failures=5
blockhost_time=60
syslog=1
session=1
premodules=WebminCore
server=MiniServ/1.670
userfile=/etc/webmin/miniserv.users
keyfile=/etc/webmin/miniserv.pem
passwd_file=/etc/shadow
passwd_uindex=0
passwd_pindex=1
passwd_cindex=2
passwd_mindex=4
passwd_mode=0
preroot=gray-theme
passdelay=1
allow=127.0.0.1		#ここへ追記(今回は何もしない←すべて許可)
必要なPerlモジュールをインストール。(Perlモジュールがないとき)
せっかくWebminをインストールしてもPerlがない為、うまく動作しなかった場合は以下のように関連するPerlもインストールしちゃいます。
ちなみにWebminはPerlスクリプトで動いているそうです。(みればわかるか。)
$ yum -y install perl-Net-SSLeay
Loaded plugins: fastestmirror, refresh-packagekit, security
Loading mirror speeds from cached hostfile
 * base: ftp.iij.ad.jp
 * extras: ftp.iij.ad.jp
 * updates: ftp.iij.ad.jp
Setting up Install Process
Resolving Dependencies
--> Running transaction check
---> Package perl-Net-SSLeay.x86_64 0:1.35-9.el6 will be installed
--> Finished Dependency Resolution

~省略~

Installed:
  perl-Net-SSLeay.x86_64 0:1.35-9.el6

Complete!
それではWebminにログインしてみよう
ブラウザで
「https://(ホスト名またはIPアドレス):10000/」
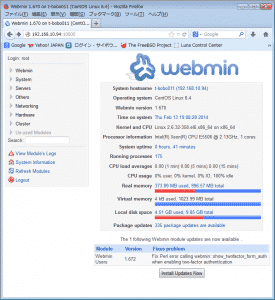
へアクセスするとログイン画面が表示されるので、 root ユーザーでログインします。
このような画面が出てきたでしょうか。出てくればまずは成功ですができない方は、いったん“https”を”http”へ変更してアクセスしてみてください。
“http”でアクセスできた場合はSSLの設定ができていないかもしれないので以下で設定していきましょう。
ブラウザでWebminへアクセスできない場合
とりあえず、WebminをインストールしているサーバーのIPテーブルを確認してみます。
$ iptables -nvL
Chain INPUT (policy ACCEPT 0 packets, 0 bytes)
 pkts bytes target     prot opt in     out     source               destination
27923   37M ACCEPT     all  --  *      *       0.0.0.0/0            0.0.0.0/0           state RELATED,ESTABLISHED
    2   120 ACCEPT     icmp --  *      *       0.0.0.0/0            0.0.0.0/0
    7   420 ACCEPT     all  --  lo     *       0.0.0.0/0            0.0.0.0/0
    1    60 ACCEPT     tcp  --  *      *       0.0.0.0/0            0.0.0.0/0           state NEW tcp dpt:22
   31  1860 ACCEPT     tcp  --  *      *       0.0.0.0/0            0.0.0.0/0           state NEW tcp dpt:80
  139  9391 REJECT     all  --  *      *       0.0.0.0/0            0.0.0.0/0           reject-with icmp-host-prohibited

Chain FORWARD (policy ACCEPT 0 packets, 0 bytes)
 pkts bytes target     prot opt in     out     source               destination
    0     0 REJECT     all  --  *      *       0.0.0.0/0            0.0.0.0/0           reject-with icmp-host-prohibited

Chain OUTPUT (policy ACCEPT 16231 packets, 1182K bytes)
IPテーブルを確認した際、Webminでデフォルトで設定されているport 10000が許可されていないので追記します。
$ vi /etc/sysconfig/iptables

# Firewall configuration written by system-config-firewall
# Manual customization of this file is not recommended.
*filter
:INPUT ACCEPT [0:0]
:FORWARD ACCEPT [0:0]
:OUTPUT ACCEPT [0:0]
-A INPUT -m state --state ESTABLISHED,RELATED -j ACCEPT
-A INPUT -p icmp -j ACCEPT
-A INPUT -i lo -j ACCEPT
-A INPUT -m state --state NEW -m tcp -p tcp --dport 22 -j ACCEPT
-A INPUT -m state --state NEW -m tcp -p tcp --dport 80 -j ACCEPT
-A INPUT -m state --state NEW -m tcp -p tcp --dport 10000 -j ACCEPT  #Port10000を追記
-A INPUT -j REJECT --reject-with icmp-host-prohibited
-A FORWARD -j REJECT --reject-with icmp-host-prohibited
COMMIT
設定を反映するため再起動を実施
IPテーブルを変更しても、そのままでは反映されないので一度以下のように該当のファイルを再起動させます。
$ service iptables restart
iptables: ファイアウォールルールを消去中:                  [  OK  ]
iptables: チェインをポリシー ACCEPT へ設定中filter         [  OK  ]
iptables: モジュールを取り外し中:                          [  OK  ]
iptables: ファイアウォールルールを適用中:                  [  OK  ]
再度iptablesを確認します。設定は反映されてIPテーブルに追加されているでしょうか。。。
$ iptables -nvL
Chain INPUT (policy ACCEPT 0 packets, 0 bytes)
 pkts bytes target     prot opt in     out     source               destination
   33  2484 ACCEPT     all  --  *      *       0.0.0.0/0            0.0.0.0/0           state RELATED,ESTABLISHED
    0     0 ACCEPT     icmp --  *      *       0.0.0.0/0            0.0.0.0/0
    0     0 ACCEPT     all  --  lo     *       0.0.0.0/0            0.0.0.0/0
    0     0 ACCEPT     tcp  --  *      *       0.0.0.0/0            0.0.0.0/0           state NEW tcp dpt:22
    0     0 ACCEPT     tcp  --  *      *       0.0.0.0/0            0.0.0.0/0           state NEW tcp dpt:80
    0     0 ACCEPT     tcp  --  *      *       0.0.0.0/0            0.0.0.0/0           state NEW tcp dpt:10000
    0     0 REJECT     all  --  *      *       0.0.0.0/0            0.0.0.0/0           reject-with icmp-host-prohibited
よし!Port10000が許可されてテーブルにも反映されていますね!
ていうか、俺はサーバーネットワークの技術をもっと磨かなけれないけないのでは。。。
それでもブラウザからいけない場合
#とりあえず、先ほども書いたように
https://(ホスト名またはIPアドレス):10000/
で行けたのでSSLが動いていない(httpsではログインできない)ことが判明しました。
つーことでついでにSSLのインストールと設定もしていきます。
SSLを起動(インストール)する
SSLのインストールと設定は別途、次回細かく書いていこうと思います。今回はWebmin側からも設定をすることで簡単にSSLを動かすことができるのでその設定で実施します。
mod_sslをインストール
今回はSSLを動作させるために“mod_ssl”を導入します。
opensslとの違いはまだまだ私にはわからないのでここでは一旦、説明を割愛致します。
$ yum -y install mod_ssl
#サーバーSSL設定
まずは以下のように該当ディレクトリへ移動します。
$ cd /etc/pki/tls/certs/
#サーバー用証明書有効期限を1年⇒10年へ変更します。
$ sed -i 's/365/3650/g' Makefile
#サーバー用秘密鍵・証明書作成します。
$ make server.crt
umask 77 ; \
/usr/bin/openssl genrsa -aes128 2048 > server.key
Generating RSA private key, 2048 bit long modulus
....................+++
..........................................................+++
e is 65537 (0x10001)
Enter pass phrase:          #パスワード
Verifying - Enter pass phrase:    #再度パスワード
umask 77 ; \
/usr/bin/openssl req -utf8 -new -key server.key -x509 -days 3650 -out server.crt -set_serial 0
Enter pass phrase for server.key:  #先ほどのパスワードをもう一度打ちます。
You are about to be asked to enter information that will be incorporated
into your certificate request.
What you are about to enter is what is called a Distinguished Name or a DN.
There are quite a few fields but you can leave some blank
For some fields there will be a default value,
If you enter '.', the field will be left blank.
-----
Country Name (2 letter code) [XX]:JP   #国を設定(2文字で書けということなので、我が国日本は”JP”で)
State or Province Name (full name) []:fukuoka   #地域
Locality Name (eg, city) [Default City]:fukuoka  #町
Organization Name (eg, company) [Default Company Ltd]:bobo.com  #会社なんでまぁ適当に
Organizational Unit Name (eg, section) []:    #何も書かないでEnterでOK
Common Name (eg, your name or your server's hostname) []:bobo.com   #ここも適当に
Email Address []:webmaster@bobo.com   #メールもこんな感じでいんじゃね。
#Webサーバー起動時にパスワードを要求されないようにする為、パスワードを削除します。
$ openssl rsa -in server.key -out server.key
Enter pass phrase for server.key:    #先ほど設定したパスワードを打ちます。
writing RSA key
#SSLを設定
$ vi /etc/httpd/conf.d/ssl.conf

# General setup for the virtual host, inherited from global configuration
DocumentRoot "/var/www/html" ←#を削除する

# Server Certificate:
# Point SSLCertificateFile at a PEM encoded certificate. If
# the certificate is encrypted, then you will be prompted for a
# pass phrase. Note that a kill -HUP will prompt again. A new
# certificate can be generated using the genkey(1) command.
SSLCertificateFile /etc/pki/tls/certs/sever.crt
# Server Private Key:
# If the key is not combined with the certificate, use this
# directive to point at the key file. Keep in mind that if
# you've both a RSA and a DSA private key you can configure
# both in parallel (to also allow the use of DSA ciphers, etc.)
SSLCertificateKeyFile /etc/pki/tls/certs/server.key ←/certs/server.keyへ修正
#SSLのコンフィグファイルを編集したので、Apacheへ設定を反映します。
$ service httpd restart
httpd を停止中: [ OK ]
httpd を起動中: httpd: Could not reliably determine the server's fully qualified domain name, using 192.168.10.94 for ServerName
[ OK ]
WebminからSSLで簡単設定しましょう!
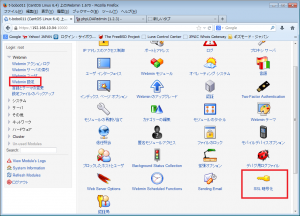
- とりあえず、httpでWebminへアクセスして「Webmin設定」から「SSL暗号化」を選択します。

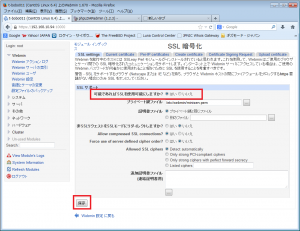
- 後は、SSLサポート画面で、SSLを使用可能にするかで”はい”を選択し、”保存”を押すだけです。

これで再度
https://(ホスト名またはIPアドレス):10000/
へアクセスすればいけるはずです!
日本語化しよう!
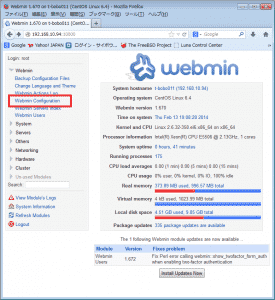
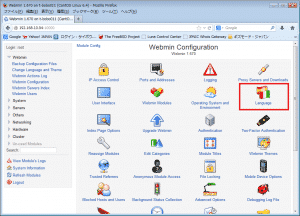
- Webmin configurationを選択

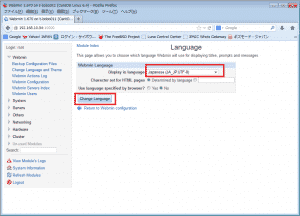
- Webmin configuration設定画面からLanguageを選択

- Lanuage設定画面で”Japanese(JA_JP.UTF-8)”を選択し、保存

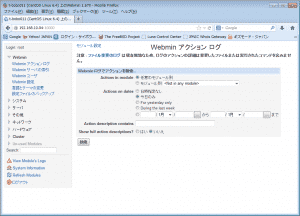
- こんな感じで日本語表記になります。

まずは使いやすくするために日本語にすることで管理、操作も楽になるのでお勧めです。
まとめ
Webminはサーバーを管理するツールとしてはかなり便利なものなのでぜひ導入することをおすすめします。
自分も今はコマンドを打つよりGUIでさらっと設定管理ができるので使いやすさはかなりあります。
でも、サーバーコマンドを覚えることが自分にとってはかなり重要なのだが。。。
以上です。

ITエンジニアの開発・検証・学習としてインターネット上で専用のサーバ(VPS)を利用しましょう!
実務経験はVPSで学べます。

コメント