「Docker-compose」で構築したDjangoではデフォルトで以下のようなトップページとなっています。
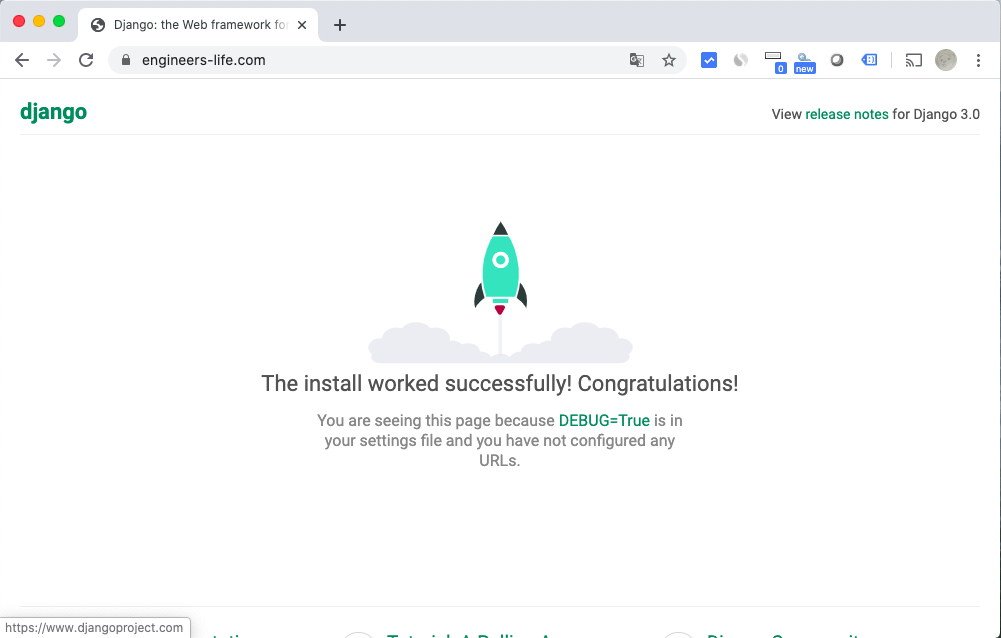
このトップページを自分で作成したページで表示する手順をまとめました。
DockerコンテナでDjangoを構築する手順は以下のページを参考にしてください。
今回の環境は、CentOS8で実施しています。
「Docker-compose」で構築したDjangoのトップページを自作のページに変更する方法
今回はDjangoのトップページにおいて簡単なページを作成して表示させる手順までをまとめます。
Djangoコンテナの構築は上記のページを参考にしてください。
今回のDjangoプロジェクトのフォルダは以下のように配置しました。
django/
|-- Dockerfile
|-- db-data
|-- docker-compose.yml
|-- manage.py
|-- myhp
|-- mysite
|-- requirements.txt
|-- ssl_certs
|-- static
`-- templates
    |-- base.html
    `-- index.html
フォルダやファイルの配置は上記のようにし、「docker-compose」の設計内容は以下となりました。
※「docker-compose.yml」
version: '3'

services:
  db:
    image: postgres
    ports:
            - 5432:5432
    environment:
            - POSTGRES_PASSWORD=postgres
    volumes:
            - ./db-data:/var/lib/postgresql/data
    container_name: postgres

  web:
    restart: always
    build: .
    command: bash -c "python manage.py runserver 0.0.0.0:8000 && python manage.py migrate"
    volumes:
            - .:/code
    ports:
            - 8000:8000
    depends_on:
            - db
    container_name: django

  https-portal:
    image: steveltn/https-portal:1
    ports:
            - 80:80
            - 443:443
    links:
            - web
    restart: always
    environment:
      DOMAINS: 'test.engineers-life.com -> http://web:8000'
      STAGE: 'production' # Don't use production until staging works
      #FORCE_RENEW: 'true'
    container_name: https-portal
    volumes:
            - ./ssl_certs:/var/lib/https-portal
volumes:
    db-data:
    ssl_certs:
上記、docker-composeの設計で「docker-compose up」を実施します。
ホームページを作成するための「アプリ」を作成
DockerでDjangoコンテナを起動したあとは、自作するホームページようのアプリを作成します。
以下では、わかりやすいように「myhp」という名前で実施します。
今回はDockerコンテナ上のDjangoに対してアプリを作成するので、以下のように、コンテナのサービス名「web」を指名して実行します。
$ docker-compose run web python manage.py startapp myhp
上記実行後、以下のように「myhp」のフォルダが作成されます。
$ ll
total 48
-rw-r--r--  1 root             root  147 Apr 28 16:17 Dockerfile
-rw-r--r--  1 root             root  174 Apr 22 19:53 Dockerfile_bk
drwx------ 19 systemd-coredump root 4096 May 22 15:14 db-data
-rw-r--r--  1 root             root  955 May 18 16:43 docker-compose.yml
-rw-r--r--  1 root             root  663 May  6 14:12 docker-compose.yml_bk
-rwxr-xr-x  1 root             root  626 May  8 15:54 manage.py
drwxr-xr-x  3 root             root 4096 May 22 15:51 myhp
drwxr-xr-x  3 root             root 4096 May 22 15:15 mysite
-rw-r--r--  1 root             root   42 May  7 18:39 requirements.txt
-rw-r--r--  1 root             root   52 Apr 12 15:34 requirements.txt_bk
drwxr-xr-x  3 root             root 4096 May  9 12:57 ssl_certs
drwxr-xr-x  4 root             root 4096 May 21 18:29 static
アプリが正常に作成されると、該当フォルダ内に以下のようなファイルが作成されます。
$ ll myhp/
total 24
-rw-r--r-- 1 root root    0 May 22 15:51 __init__.py
-rw-r--r-- 1 root root   63 May 22 15:51 admin.py
-rw-r--r-- 1 root root   83 May 22 15:51 apps.py
drwxr-xr-x 2 root root 4096 May 22 15:51 migrations
-rw-r--r-- 1 root root   57 May 22 15:51 models.py
-rw-r--r-- 1 root root   60 May 22 15:51 tests.py
-rw-r--r-- 1 root root   63 May 22 15:51 views.py
$
親プロジェクトに作成したアプリ名を追加
次に、親プロフェクトに上記で作成したアプリ「myhp」を追加します。
以下で親プロジェクトの「settings.py」を編集します。
$ vim mysite/settings.py
settings.pyで以下の該当箇所を編集します。
# Application definition

INSTALLED_APPS = [
    'django.contrib.admin',
    'django.contrib.auth',
    'django.contrib.contenttypes',
    'django.contrib.sessions',
    'django.contrib.messages',
    'django.contrib.staticfiles',
    'myhp',
]

------中略------

LANGUAGE_CODE = 'ja'
#LANGUAGE_CODE = 'en-us'

TIME_ZONE = 'Asia/Tokyo'
#TIME_ZONE = 'UTC'

USE_I18N = True

USE_L10N = True

USE_TZ = True
管理ユーザーを作成する
次にDjangoの管理ユーザーを作成します。
DjangoはDockerコンテナで構築しているので以下のコマンドで実行します。
※エラーが発生した場合、次の項目の「migrate」を先に実行します。
$ docker-compose run web python manage.py createsuperuser
Username (leave blank to use 'root'): admin
Email address: test@gmail.com
Password:
Password (again):
Superuser created successfully.
$
上記設定が成功したら以下の該当アドレスにアクセスします。
https://IPアドレス/admin
今回の設定は、SSLで構築した環境となっているので上記となりますが、デフォルトは以下のURLで管理画面にアクセスできます。
http://IPアドレス:8000/admin

設定を同期するために「migrate」を実行
上記の設定をしたあとは、「migrate」を実行し同期させます。
$ docker-compose run web python manage.py migrate
Operations to perform:
  Apply all migrations: admin, auth, contenttypes, sessions
Running migrations:
  Applying contenttypes.0001_initial... OK
  Applying auth.0001_initial... OK
  Applying admin.0001_initial... OK
  Applying admin.0002_logentry_remove_auto_add... OK
  Applying admin.0003_logentry_add_action_flag_choices... OK
  Applying contenttypes.0002_remove_content_type_name... OK
  Applying auth.0002_alter_permission_name_max_length... OK
  Applying auth.0003_alter_user_email_max_length... OK
  Applying auth.0004_alter_user_username_opts... OK
  Applying auth.0005_alter_user_last_login_null... OK
  Applying auth.0006_require_contenttypes_0002... OK
  Applying auth.0007_alter_validators_add_error_messages... OK
  Applying auth.0008_alter_user_username_max_length... OK
  Applying auth.0009_alter_user_last_name_max_length... OK
  Applying auth.0010_alter_group_name_max_length... OK
  Applying auth.0011_update_proxy_permissions... OK
  Applying sessions.0001_initial... OK
$
ルーティングを設定する
Djangoプロジェクト全体のルーティング設定ファイルを設定します。
プロジェクト「misite」配下の「urls.py」を編集します。
$ vim mysite/urls.py

------中略------

from django.contrib import admin
from django.urls import path, include #追加

urlpatterns = [
    path('admin/', admin.site.urls),
    path('', include('myhp.urls')), #追加
]
6行目でinclude関数をインポートします。
10行目でプロジェクト「mysite」がアプリ「myhp」をincludeするように設定します。
path関数の第一引数が「”」となっているのは、以下にマッチングします。
http(s)://<ホスト名>/〜
http(s)://<IPアドレス>/〜
第2引数の「include」は、include関数を使って「myhp/url.py」に処理を渡す命令を書いています。
ホームページ用のHTMLを作成
プロジェクトとアプリを作成している同じ階層で以下「template」フォルダを作成します。
$ mkdir templates
同じ階層で「template」フォルダが作成されたことを確認します。
$ ll
total 52
-rw-r--r--  1 root             root  147 Apr 28 16:17 Dockerfile
drwx------ 19 systemd-coredump root 4096 May 22 15:14 db-data
-rw-r--r--  1 root             root  955 May 18 16:43 docker-compose.yml
-rwxr-xr-x  1 root             root  626 May  8 15:54 manage.py
drwxr-xr-x  4 root             root 4096 May 22 16:30 myhp
drwxr-xr-x  3 root             root 4096 May 22 16:40 mysite
-rw-r--r--  1 root             root   42 May  7 18:39 requirements.txt
drwxr-xr-x  3 root             root 4096 May  9 12:57 ssl_certs
drwxr-xr-x  4 root             root 4096 May 21 18:29 static
drwxr-xr-x  2 root             root 4096 May 22 16:41 templates
次にtemplateフォルダ配下へ移動します。
$ cd templates/
「template」フォルダないに以下HTMLファイルを作成します。
base.html作成
$ vim base.html
<html>
    <head>
        <title>ホームページ</title>
    </head>
    <body>
        <p>ここがbase.htmlです。</p>

    {% block main_containts %}
    {% endblock %}

        <p>ここがbase.htmlです。</p>
    </body>

</html>
index.html
$ vim index.html
{% extends "base.html" %}
{% block main_containts %}
{% load static %}

  <main>
    ここがindex.htmlです。
  </main>

{% endblock %}
Viewを作成する
アプリケーション用ディレクトリ「myhp」に自動作成されている「view.py」に処理を記述します。
$ cd myhp
$ ll
total 28
-rw-r--r-- 1 root root    0 May 22 15:51 __init__.py
drwxr-xr-x 2 root root 4096 May 22 16:30 __pycache__
-rw-r--r-- 1 root root   63 May 22 15:51 admin.py
-rw-r--r-- 1 root root   83 May 22 15:51 apps.py
drwxr-xr-x 3 root root 4096 May 22 16:30 migrations
-rw-r--r-- 1 root root   57 May 22 15:51 models.py
-rw-r--r-- 1 root root   60 May 22 15:51 tests.py
-rw-r--r-- 1 root root   63 May 22 15:51 views.py
$
「view.py」を編集します。
$ vim views.py
今回は5行目〜11行目を追記します。
from django.shortcuts import render

# Create your views here.

from django.http import HttpResponse
from django.template import Context, loader

def index(request):
    template = loader.get_template('index.html')
    context = {}
    return HttpResponse(template.render(context, request))
「myhp」配下でurls.pyを新規作成
上記で、プロジェクト「mysite」配下のurls.pyを作成しましたが、アプリ「myhp」配下にも新規で「urls.py」を作成します。
「urls.py」新規作成します。
$ vim urls.py
「urls.py」で以下のように設定をします。
from django.urls import path
from . import views

app_name = 'myhp'
urlpatterns = [
    path('', views.index, name='index'),
]
プロジェクト「mysite」で「templates」を読み込むようにする
vim mysite/setting.py
TEMPLATES = [
    {
        'BACKEND': 'django.template.backends.django.DjangoTemplates',
        'DIRS': ['templates'], #追加
        'APP_DIRS': True,
        'OPTIONS': {
            'context_processors': [
                'django.template.context_processors.debug',
                'django.template.context_processors.request',
                'django.contrib.auth.context_processors.auth',
                'django.contrib.messages.context_processors.messages',
            ],
        },
    },
]
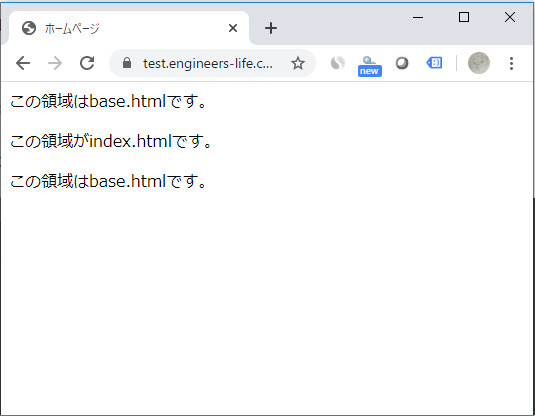
上記設定を追加することで、ドメインのトップページへアクセスすると下記のような画面になります。
CSS, JavaScript, Imagesはスタティックフォルダに保存する
ちなみに「setting.py」で以下の記述が書かれています。
# Static files (CSS, JavaScript, Images)
# https://docs.djangoproject.com/en/3.0/howto/static-files/

STATIC_URL = '/static/'
上記のとおりCSSやJavaScript、Imagesファイルはスタティックフォルダを作成し、その配下に保存するようにしましょう。
Bootstrapで取得した「CSS」や「js」はこの配下に保存しています。
DockerコンテナでDjangoの簡単なホームページの作成は以上となります。
ITエンジニアの開発・検証・学習としてインターネット上で専用のサーバ(VPS)を利用しましょう!
実務経験はVPSで学べます。

コメント